

How To Put Two Audio Files Together Audacity
Mixing refers to the procedure of combining multiple Audacity tracks which play simultaneously into a unmarried track.
Audacity mixes automatically when playing or exporting, only it can also physically mix selected multiple tracks together into one within the project. All selected tracks are mixed, regardless if the or buttons on any tracks are set to silence their playback.
The channel of a track beingness mixed affects whether information technology will be mixed into the left channel of the resulting rails(due south), the correct channel, or both (mono). For case, if you have four tracks:
-
- Runway 1: left aqueduct
- Rails ii: left aqueduct
- Track iii: correct channel
- Track 4: mono channel
and you select them all and perform a Mix and Render, yous volition end upward with one stereo track: the left channel will contain a mix of tracks ane, 2, and four and the right channel will contain a mix of tracks 3 and 4.
Mixing
Mixing can be done for a number of reasons, for instance mixing spoken language with groundwork music to make a podcast, or adding different instruments into the aforementioned song. Concatenating songs (for example, playing three songs one after the other) does not necessarily involve mixing, just if you wanted the songs to fade into each other it would involve mixing.
Within an Audacity projection, yous can physically mix selected multiple selected tracks into a single mono or stereo rail using either of two explicit mix commands:
- - which replaces the original track(southward) with the mixed track
- - which adds the mixed rails to the project, preserving the original tracks.
Past default, multiple stereo tracks are mixed downward to a single stereo file on Consign.
Too past default, multiple mono tracks are mixed downwardly to a mono file, but if you pan any mono tracks to left or right or if at that place are whatever stereo tracks in the mix, the tracks are mixed to a stereo file. Note that the mono tracks are mixed to both the left and right channels of the resulting stereo file.
The Mixed and Rendered rail volition be placed where the bottom selected runway was and given the proper noun "Mix".
Unless, that is, a single selected track is rendered in which case it will retain its position, its track proper name and its properties (display type, waveform color)
Note that this may be useful in retaining membership of any Sync-Locked Track group to which the track(southward) may have formerly belonged.
In Audacity, mixing is automated. You could just put audio into two different tracks, play to listen to the outcome then consign it as an audio file like MP3 or WAV or burn the WAV to Audio CD .
However once sound has been finally mixed (using Mix and Render or as in an audio file you might import into Audacity) it is essentially impossible to separate out all the original parts again; information technology is like trying to take the banana out of a assistant shake later on yous have already put it through the blender. At that place are a few occasions when information technology really is possible to separate sounds a scrap - yous can sometimes isolate the bass, or remove the lead vocals. But these processes do not e'er work well and usually cause some quality loss. So remember, equally long as the multiple tracks are inside an Audacity project, you tin manipulate them independently, but once you lot export every bit a mixed downwardly file you cannot expect to separate the different parts over again. And so go on your Brazenness project around if yous plan to keep editing!
Although Audacity by default exports files as either ii channel stereo or single channel mono (if exporting unpanned mono tracks), you can too consign multi-channel files having more than 2 channels, such as a v:one file. To enable this, cull "Use custom mix" in the Import / Export Preferences.
The controls used for mixing are the and buttons and the Gain (-.....+) and Pan (L.....R) sliders.
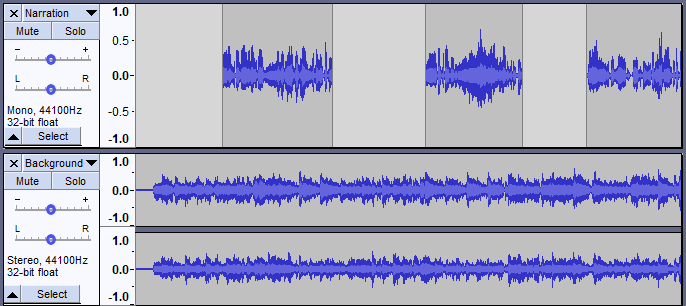
In the above example, mixing the mono (upper) and stereo (lower) rails ways that the audio of the mono track will be heard equally in both left and correct channels of the resulting stereo mix.
Muting and Soloing
When working with multiple tracks, information technology is ofttimes of import to be able to hear only one at a time. Each track has a Mute and a Solo button, allowing you to temporarily hear merely some of your tracks.
- causes a track to be silenced. More than ane track can be muted.
- tin deport in 2 different ways depending on the setting fabricated in Tracks Preferences.
- Default beliefs, the "Simple" setting, is that clicking Solo on any track mutes all the other tracks. To solo more than one track, hold Shift down while clicking the button on the boosted tracks to be soloed. On the boosted tracks that are soloed, the Solo push button overrides the Mute push.
- Selecting "Multi-track" setting will conform those used to mixing desks and other professional audio software. Whatsoever number of tracks tin be made solo and so that they mix together. If any Solo button is down this overrides the Mute button. If on any occasion you lot want the Solo push to play simply ane track at a fourth dimension (so that clicking it releases any other Solo buttons), hold down Shift when clicking Solo.
- None: A third option in Tracks Preferences, the "None" setting, removes the Solo push button from all tracks, leaving merely a Mute button which silences whichever track or tracks information technology is applied to. If on whatever occasion you desire the Mute button to silence just one track at a time (then that clicking it releases any other Mute buttons), hold down Shift while clicking Mute.
Y'all tin can press the and buttons while tracks are playing.
If you are using the keyboard, Shift+U toggles muting on the currently focused track which has the yellow edge, and Shift + S toggles soloing. The solo shortcut works even if you lot hide the Solo button.
| | Sometimes it tin can be handy to export a preliminary mix with one or more of the tracks left out. Exporting will automatically ignore any tracks on which the button is pressed. |
Gain and panning
Above the Mute / Solo buttons, each rail has a - / + gain slider which adjusts the track's volume, and an L / R pan slider which adjusts the track's stereo position in the overall mix - whether information technology comes from the left speaker, correct speaker or in-between. To change the value, but click on the slider and elevate. For finer command when dragging, hold Shift while dragging or double-click on the slider or slider scale to enter a precise value every bit text.
The normal range of gain is from -36 dB to 36 dB. If you demand more, choose .
If you are using the keyboard, utilise:
- Alt + Shift + Up to increment the gain on the focused track or Alt + Shift + Downwardly to reduce it
- Utilize Alt + Shift + Left to pan left on the focused track or Alt + Shift + Right to pan right.
Or press Shift + G to accommodate the gain in a dialog box or Shift + P to suit the pan.
If you practice not see the gain or pan slider for a track, you may need to brand information technology taller. Position the mouse on the bottom edge of the waveform and drag downward. You lot can use the button with the upward pointing arrow (below the pan slider) to collapse the runway upwards to a minimal height.
Explicit Mixing and Rendering
While mixing is automatic on playback and consign, there are times when you may desire to explicitly tell Audacity to mix several tracks. This is useful in several ways:
- You lot can consolidate tracks which yous accept finished working on, making it easier to come across the other tracks without scrolling up and down
- Playback may respond more quickly with fewer tracks
- Yous can encounter what the final mix will wait like as a waveform so as to cheque the overall level of the final mix before exporting information technology.
To mix explicitly, select all the tracks yous want to mix together so choose either or (shortcut Ctrl + Shift + M).
| | For mouse users, a quick way to select multiple tracks is to select the first rail by clicking on its Track Control Panel, then hold Shift while clicking on the Rail Control Panels of the other tracks yous want to select. |
Several things happen when you choose either of the Mix and Return commands:
- All selected tracks are mixed downward to a single rail called "Mix".
- Except when Rendering just a single track, when it volition retain its original track name.
- If you choose "Mix and Render", the resulting track replaces the selected original rail(s).
- If you cull "Mix and Return to New Track", the original tracks are preserved so that the resulting track becomes an additional track in the project.
- The "Mix" track is always placed in place of (Mix and Render) or underneath (Mix and Render to New Rails) the bottom selected rail.
- The new mixed track volition exist stereo unless the tracks you lot mixed were mono tracks panned to center.
- If any of the original tracks did non match the sample charge per unit of the project (set at bottom left of the projection window in Choice Toolbar), they will exist resampled to match the project rate.
- Any envelope points defining amplitude modifications will be applied and the previous envelope points removed.
- Gain and panning changes will exist applied and the sliders reset to normal in the mixed track.
Yous can always if you are not happy with the results of Mix and Render, and so brand changes and endeavour it again.
Mixing Levels
The act of mixing multiple tracks adds the waveforms together. In most cases this volition cause the mixed track to have a higher peak and RMS (average) level than the individual pre-mixed tracks, though this is non e'er true by definition. How much (or whether) the peak level increases and how much louder information technology actually sounds depends on how related the waveforms of the mixed tracks are.
When peaks or troughs in the waveform coincide, the waveforms will reinforce each other, leading to an increased betoken level. In fact if y'all combined two identical tracks, the signal level would exactly double, leading to an increase in peak level of 6 dB. Just when a elevation in ane rails coincides with a trough in another track the waveforms will tend to cancel each other out, leading to a lower level in the mix at that point.
Also the more tracks that have sound at the same point on the Timeline, the higher the mix level is likely to be.
The overall mix level is indicated on the Playback Meter when the project is playing. You can come across individual meters for each track (showing the levels as modified by the track's gain/pan sliders and mute/solo buttons) if you enable .
| | Because mixing tracks is additive, the combined level may testify clipping distortion in the Meter Toolbar. In that case, you should use the gain sliders on one or more tracks to reduce the overall level.
|

How To Put Two Audio Files Together Audacity,
Source: https://manual.audacityteam.org/man/mixing.html#:~:text=To%20mix%20explicitly%2C%20select%20all,Ctrl%20%2B%20Shift%20%2B%20M).
Posted by: norwoodthisper.blogspot.com
0 Response to "How To Put Two Audio Files Together Audacity"
Post a Comment